Welcome to my DIY experience with a Rav4 2002 Power steering rack. Find here well detailed removal procedure to perform yours!
Rav4 2002 steering rack disassembly steps!
If the front of the car already raised up and supported by two jack stands to the chassis or the crossmember, you don’t need to start the car, but if the four wheels of the vehicle are still on the ground, you need to start the car to center the vehicle and lock the steering wheel in the center.
Let’s start with basic tools for unmounts procedure!
16-Basic tools I used for 2002 Rav4 power steering rack unmounts procedure:
- 4-way cross lug wrench
- A Cric
- Two Jack stands
- ⅜-Inch Drive 10mm socket
- 10mm wrench
- ⅜-Inch Drive 12mm socket
- 12mm wrench
- ⅜-Inch Drive Ratchet
- ½-Inch Drive Ratchet
- 19mm wrench
- ½-Inch Drive 17mm Socket
- 22 mm wrench
- Flat screw driver
- 17 mm wrench
- A Hammer
- A Long-nose Pliers
The first thing you have to do is to park the vehicle in a straight line and after centering the steering wheel, lock it.
Center and lock the steering wheel
How to center and lock the steering wheel?
With the key in the “ON” position, you turn the steering wheel until it is corner one side and then mark the number of turns by returning to the opposite side until you jammed it. Once blocked on the opposite side, make half of the turns got to return to the center.
Finally, once in the center turn the key and remove it to the off or locked position, then turn the steering wheel gently to the left until the perception of the immobilization of the steering wheel which confirms the locking of it.
Then loosen the front wheels of the car and lift it up if you haven’t already done so. Do not forget to remove the steering rack and pinion, the right car must immobilized by jack stands or lifter if you have it.
Disconnect the battery
To operate cleanly without electrical shock to the vehicle, it is best to disconnect the battery after locking the steering wheel.
Where is the battery and how to disconnect it from the car?
Usually housed in one corner under the hood of the vehicle you will see it attached by a mounting bracket. On some models of cars, such as the 2002 Rav4, you need to detach an opening at the bottom on the right side after lifting the hood, to reach the battery.
To disconnect the battery, simply disconnect the negative terminal first and replace it last. We disconnect most car battery by loosening the terminals using a 10mm wrench.
Here we go, it’s time to remove the loads to disassemble the steering rack.
Here I’m sharing instructions specifically dedicated to the 2002 Rav4, but the principle applies to almost any vehicle.
Uncouple the steering column to steering pinion
-Under the steering wheel behind the pedals, you’ll find the lower column hole cover, unscrew it with a 10mm socket. Then slide it to the top of the part that content universal joint then disconnect the lower joint to the intermediate shaft.
To get the sliding movement of the steering assembly shaft, unscrew two screws at each end of this part, then make it slide by pulling with continuous upward vibrating force.
Once detached steering assembly shaft from the intermediate shaft, do not remove the lower cover of the power steering column hole so as not to forget it when reassembling, as it contains a silencer sheet that protects the assembly shaft lower joint from dirt.
Disconnect the steering rack to knuckle
Now let’s moving outside the vehicle!
The steering knuckle attached to both ends of the steering rack by the tie-rods ends. Start by counting the number of tread that are on the inner tie rod exactly last the clamping nut that attaches it to the steering tie-rod end. This number of threads will allow you to keep the initial length when reassembling a new tie-rod end in case the old one has to be replaced.
With the lock nut technique use two wrenches to loosen the tie-rod end with jam nut.
Now begin by removing the cotter pin and nut that attaches the tie-rod to the steering Knuckle. After loosening the nut, leave it to the end of the thread. If you do not have a universal tie rod end puller, tap the side of the steering knuckle closest to the tie-rod ends with a hammer until the part loosens, then finish removing the nut from the thread. Do the same for the opposite side.
Confirm your diagnostics to perform a good repair
A mechanic is not a magician. Once you have released your steering knuckles, confirm your diagnostics: that is, test to find out why you are going to change some or all of the part.
If you can already feel the problem at the wheel, you still need to fix it. Avoid recommendations based on dubious claims, if you tell fault a part, you must have at least one reason proven by a test.
Do not expect by driving with a perceived anomaly will improve the situation, even you know where the problem comes from. If you drive with a defective steering rack, you risk your life and other part of the car. Expect a more expensive repair too.
Here are 7 problems telling steering rack or pump is defective?
- A damaged inner tie rod
- A bad tie rod end
- Oil leakage from the steering rack
- Ripped Rack and pinion Steering boot
This problem will progressively let in sludge and grit to create a play in the movement of the inner tie-rod, clog the steering rack. Which will force the steering pump to make much more efforts and finally destroy the seals. If you keep seeing PS oil spilling under the car, know that it’s already done: you’re in trouble!
- A leak in the return tube or the pressure feed tube. This kind of failure happens rarely because the tube should be dry to crack by itself.
Most often, it is the negligence of a mechanic who either by doing other work in stuck places damages these pipes or by reassembling them changes their trajectory which puts them in connection with other organs which heat them or rub them during the running of the engine until perforation.
-
A bad steering rack mount bushing does not happen often, but can happen after an accident or by the wrong way of parking or leaving a curb. If you hear a clicking sound or feel a jerking movement in the steering wheel know a bad steering bushing might be the cause. Inspect the steering bushing to confirm it.
-
Neglected maintenance of the power steering fluid or regular use of the wrong fluid, these neglects will destroy the PS and the internal seals. Check your power steering fluid periodically 3-5000 miles or each 3 months.
My problem with this steering rack is a crushed mounting support bushings which causes vibration to the steering wheel, especially when turning on the highway. To solve this kind of problem, I right either changed its support bushings or changed the whole steering rack.
I often hear owners ask: should they repair or change the steering rack?
Because of economic reasons, repair some parts instead of changing them, but it is not always helpful.
Carservicecosts said:
Rack and pinion repair cost is between $350-$1,700 for parts and labor, whereas the parts alone can cost anything from $200 to $1,000. Also, rack and pinion replacement is a very complicated procedure that requires professional expertise, and the average car owner may not do the installation on their own.
Personally, I wouldn’t recommend to fix a steering rack by repair kit either.
So let’s continue with the steering rack disassembly.
Unscrew the hoses and support bolts to the steering rack?
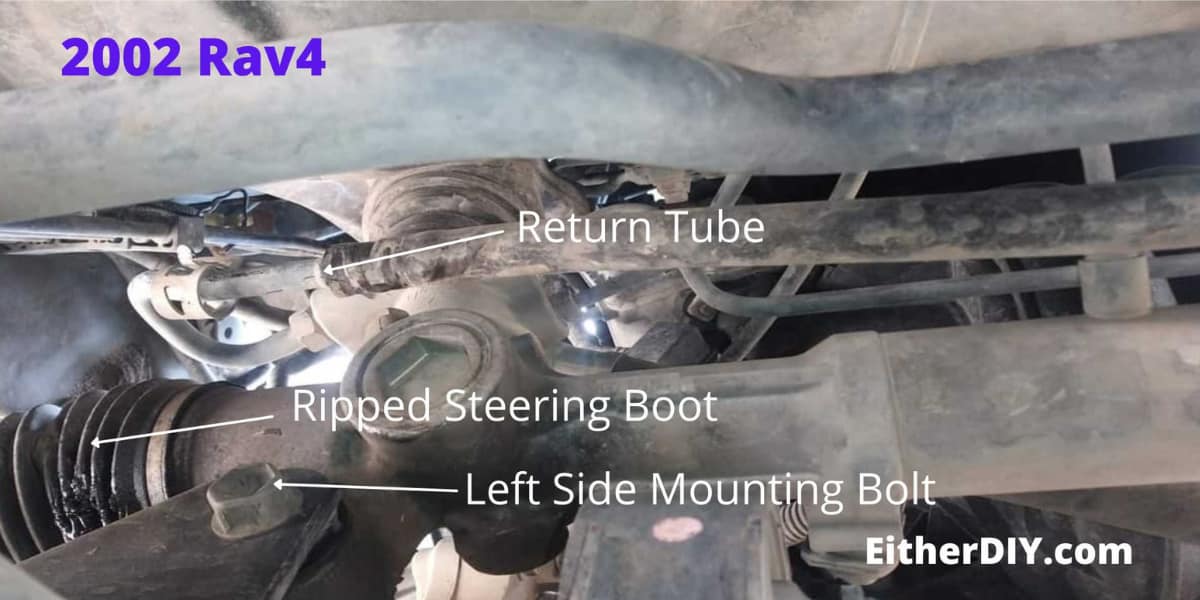
After releasing the steering rack to the steering column and wheel, we need to remove other loads, such as unscrewing the screws on the steering rack that support the return tube and the feed tube. Be aware that the return tube differs from the pressure feed tube by clamps on the length of this tube and their mounting position up and down.
How to disassemble the hoses to the steering rack?
With a long-nose pliers pinch the clamp closest to the end of the return tube hose and pull it back farther onto the tube. You need to provide a container to collect the oil from both hoses and then, once done, remove the return tube hose with vibrating movements, avoid pulling it out with screwdrivers to avoid damaging the hose. Use WD-40 for Steering mounting bolts and the pressure feed tube nut.
If, like me, you are working on a 2002 Rav4, remove the pressure feed tube to the steering rack with a 17 mm wrench. Once you removed all the loads, unscrew the steering rack support bolts to bring it back out its compartment.
Please be aware that I am not responsible for not following the safety instructions which can cause serious injury. Please do your own research.
Good repair guys, if I do it myself you can too! 💪
